| .. | ||
| readme-assets | ||
| README.md | ||
| README.md.backup | ||
| sprites.png | ||
Flappy Bird
Sprites
A sprite is an image, but you will notice that all resources are in the same image, what now? When you create a Sprite, it will indicate no Texture in the inspector (left side of the screen). We can fix this by clicking Texture and adding an AtlasTexture and adding the texture file (click on the AtlasTexture, then on 'Empty' next to Atlas and browse to the texture). We don't want the entire texture, only a segment, Regions to the rescue. Enable Auto Slice and click on the part of the texture you want.
![]()
![]()
Why make it so complicated? I have no idea, Flynn said so.
Background
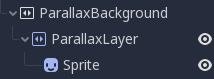
So presuming you want to create FlappyBird, you will need an infinite scrolling background. We can already create one sprite, but that ain't gonna cut it. What we want is a 'ParallaxBackground', this used 'ParallaxLayers' to imitate the parallax effect (where the background in the back goes the slowest etc). In this parallaxlayer you can put a sprite, and bada bim bada boom, everything works. (Don't forget to change parallaxlayer/motions/Scale/x value, and set mirroring x to the width of the sprite).
Player
The player, or bird, has to do a lot of different things like move, detect collisions, move the camera, and not look all ugly. So let's first build the right nodes, then add a script to do things.
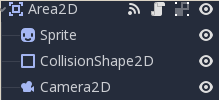
To bundle all nodes together we can use a 'Area2D'. To make it more birdlike let's add a bird sprite, we will come back to change this in an animation. To detect collisions, a CollisionShape2D would be perfect. This CollisionShape2D needs a Shape, birds are rather capsul shaped, so capsul it is... Move the handles so the capsul aligns the most with the bird image. Next we can add a Camera2D, so the camera follows our bird.
This bird isn't doing a lot, let's add a script (to the root Area2D node). You are all informatici so I'll be going very quick. Your script extends the Node it is attached to, so you can just change values at will, like position or rotation. Godot uses event signals other nodes can listen to, so a 'hit' signal could be very useful signal hit. You can set your bird in the middle of the screen by the editor or by script, I choose both, because why not. Screen_size can be acquired with get_viewport_rect().size. As the default script indicates, there are _ready() and _process() functions to implement, which get called when the node is being built, and on every frame respectively. I chose to implement gravity by hand with speed vectors etc. To update my velocity vector I had to get use input, Input.is_action_just_pressed("ui_accept") is the way to check if "ui_accept" is pressed (See project -> project settings -> Input Map). To access children nodes you can use $node_name like $CollisionShape2D. To listen to signals, click on your Area2D node, then right side on 'node' here you can listen to all the signals, this will create a function in you script that is ran on that signal. As a guideline, this was about 50 lines of code.
Tip: Declare static variables as 'export var' so you can manipulate them from the editor.
Tip: Disable CollisionShape2D by .set_deferred("disabled", true) to stop getting _on_Player_body_entered signals.
At this point, you should be able to fly your bird :o.
Towers
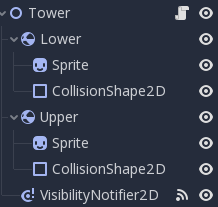
We need a scene for the towers the bird should dodge. Because we group 2 towers (upper and lower) together, a Node2D is the correct option as root node. Godot does some optimization when it comes to physics etc. RigidBody2D is optimized to not get influenced by physics like gravity, perfect, because the don't use the build in gravity. 1 tower could be a RigidBody2D with a Sprite and a CollisionShape2D. Duplicate and change the Node2D transform properties to make them the way you want them.
When you add a VisibilityNotifier2D you can listen to events like screen_exited() etc, you can use this to free the nodes when they exited the screen (queue_free() is a thing). I emitted a special 'exit' event when this happens so the main scene can listen to 'exit' events.
Because FlappyBird is an infinite scroller, you have to spawn towers from a script somewhere.
Main
The Main scene bundles everything to a playable fun coherent game. Add a player, the background and a script.
The script may be a little tricky because you have to spawn towers all the time... To spawn scenes you first have to locate the scene, called a packed scene. For me it was the following:
export (PackedScene) var Tower = preload("res://Tower.tscn");
The approach I took, was building enough Towers in advance, then every time one exited the screen build a new one. To create a Tower instance you can Tower.instance(), and don't forget to link the signal events to the correct functions, for me tower.connect("exit", self, "_on_Tower_exit") did the trick.
UI
TODO?